Saturday, August 20, 2022

Using Recoil with SPFx

Try out the latest alternative to Redux with SPFx


When developing with Redux or MobX, we have had to deal with the inherent complexity of these technologies. We all wish that there would be something that is simpler and easier to implement, some tech that feels more native to React programming with hook like syntax.

Is there a new technology that we can use? Yes, it's from Facebook and is called RecoilJS or simply Recoil

What is Recoil

Recoil is a State management library that allows you to define global state in manageable chunks called Atoms (instead of one large state object in Redux) and use them in your React components across your application, either directly or via selectors. Recoil Selectors are pure functions that are re-evaluated when the up-stream atoms are updated.

You can find more about Recoil at the official Website - https://www.recoiljs.org

Advantages of Recoil

  • Simple and easier syntax compared to Redux
  • Use of modern React Hooks
  • Multiple state objects (atoms) instead of one monolithic global state object
  • Pure function based selectors instead of switch-case based reducers
  • selectors are re-evaluated when atoms are updated
  • Selectors can derive from other selectors
  • Support for synchronous and asynchronous selectors

Core Concepts of Recoil

Recoil has two core concepts


  • Atoms - Atoms are global shared state objects. Each Atom has a unique key meaning that no two atoms can have the same key. Atoms are used as global state objects instead of lifting the React component state up.Atoms can be updated and are subscribable. Any component that uses an Atom value is refreshed atomatically whenever the value of that atom changes.

Lets say we want to store the information about a customer in a global state object. This can be done by defining the same as an atom -

  • To define an atom, create a separate file, say GlobalState.ts.
  • Define the interface for the Customer.
  • Next write the imports and define the atom as shown below -

GlobalState.ts

// GlobalState.ts - Global atoms and selectors
import { atom, RecoilState } from 'recoil';

export interface ICustomer {
    id: number;
    name: string;
    limit: number;
}

export const custState: RecoilState<ICustomer> = atom({
    key: 'custatom1',
    default: {
        id: 0,
        name: '',
        limit: 0
    }
});

The above code defines an atom (global state object) that we can use in the entire component hierarchy of the React App or SPFx React component tree.

  • Selectors - Selectors are pure functions that accept atoms or other selectors as input. Whenever the upstream atoms or selectors are updated, these selectors are re-evaluated. Components subscribing to the selectors are re-rendered whenever the atoms or selectors that they depend on, are changed.

Selectors can be defined in the same file where the atoms are defined. In our case we will write the code for the selector in GlobalState.ts.

First update the imports section to import a selector in addition to atom and RecoilState as shown below -

    import { atom, RecoilState, selector } from 'recoil';

Next let's write a selector function to return the Customer information as a string -

    export const customerInfo = selector({
        id: 'customerInfo',
        get: ({get}) => {
            const cust = useRecoilState(custState);
            return `${cust.id} - ${ cust.name } - ${cust.limit}`;
        }
    });

In the above code, the useRecoilState hook allows us to fetch the Atom as a plain object which is stored in the variable called cust. The selector 'customerInfo' then returns an interpolated string with the customer data.

Whenever the custState changes, customerInfo will be re-evaluated and all the components that are using the customerInfo selector will be refreshed.

How to consume the recoil atoms/selectors in components

There are two ways to consume the Global state. The first one is by consuming an atom value and the second is by consuming the value returned by a selector. To demonstrate this, let's create two components, the first one will use an atom value directly and the second one will use a selector.

CustomerData.ts

This component imports the custState atom from GlobalState.ts and makes use of the useRecoilValue hook provided by recoil to consume the custState object values.

// CustomerData.ts - Display customer data dirctly from custState atom
import * as React from 'react';
import { useRecoilValue } from 'recoil';

import { custState } from './GlobalState';

export default function CustomerInfo() : JSX.Element {

    const cust = useRecoilValue<ICustomer>(custState);

    return (
        <div>
            <h1>Customer Details -</h1>
            <div>
                ID: { cust.ID } <br/>
                Name: { cust.Name } <br/>
                Limit: { cust.Limit }
            <div>
        </div>
    );
}

Whenever any component updates the custState atom, CustomerData component will be refresh automatically.

CustomerDetails.ts

This component uses a Recoil selector instead of a Recoil Atom. Remaining logic remains the same. Since the selector customerInfo returns a string, the useRecoilValue hook uses string as the type

// CustomerDetails.ts - Display customer details via the CustomerInfo selector
import * as React from 'react';
import { useRecoilValue } from 'recoil';

import { customerInfo } from './GlobalState';   // selector

export default function CustomerDetails() : JSX.Element {

    const custInfo = useRecoilValue<string>(customerInfo);  

    return (
        <div>
            <h1>Customer Details -</h1>
            <div>
                { custInfo }
            <div>
        </div>
    );
}

Please note how, in both components, useRecoilValue hook is used.

Setting up the components

In order to use these components, a root component, preferably the App component or a child-component of the App component must include a special RecoilRoot component. Recoil-based components will only work when placed under the RecoilRoot component and its children. Placing Recoil-based components elsewhere will throw an error during run-time.

In order to make the CustomerInfo and CustomerDetails components work, we have to place them inside a RecoilRoot component. RecoilRoot must be imported first from the 'recoil' package.

The following is a top-level component called CustomerDemo that contains both these components as children -

import * as React from 'react';
import { RecoilRoot } from 'recoil';
import CustomerInfo from './CustomerInfo';
import CustomerDetails from './CustomerDetails';

// Function component containing both recoil-based components
export default function CustomerDemo() : JSX.Element {
    return (
        <RecoilRoot>
            <CustomerInfo />
            <CustomerDetails />
        </RecoilRoot>
    );
}

In the above example, both CustomerInfo and CustomerDetails components make use of a Recoil Atom and Selector. Any change that takes place in the custState atom, triggers a refresh in both these components. (Note: we have not written any code to make changes to the state. This can be easily done via a Form).

Using Recoil with SPFx-React Project

Using Recoil with a SPFx project is straightforward. First create a SPFx+React project and then install Recoil using npm.

Create a SPFx-React Project using Yeoman

yo @microsoft.sharepoint

In the wizard choose WebPart, React as the framework. Next wait for the creation of the project and npm packages to be downloaded.

Next install the Recoil library using the following npm command -

npm install recoil

Creating a Simple Temperature Conversion WebPart

For this article, we will be creating a simple Temperature conversion WebPart that stores the input temperature in Celcius as a Recoil Atom (number) and derive the converted value in Farenheit as a selector.

The temperature value will be stored in an Atom called temp defined in GlobalState.ts which is then imported into other components.

GlobalState.ts

This file defines an Atom called temp which stores the input temperature in Celcius. Components can use this Atom and also update it.

Next we define a selector called farenTemp which converts the value in the temp Atom (C) to Farenheit value. This is done in the get property.

Note that both atom and selector are functions that receive a JSON object with the settings.

// GlobalState.ts : Store all the Recoil Atoms & Selectors here
import { atom, RecoilState, selector } from "recoil";

// Atom to store Celcius temperature
export const temp : RecoilState<number> = atom<number>({
    key: 'tempState',
    default: 0
});

// Selector to convert C to F
export const farenTemp = selector({
    key: 'farenTempState',
    get: ({get}) => {
        const t = get(temp);

        return ((9/5) * t) + 32.0;
    }
})

Remember to drop this file under the components folder in the SPFx WebPart project.

Celcius.tsx

This component dislays an HTML Input and allows the user to enter a temperature value in Celcius. As the user types into the input field, the change event fires and is handled by an event-handler. Inside this event handler, the atom value is updated using the setCelcius function.

Notice how the [celcius,setCelcius] syntax is similar to the useState hook syntax.

// Celcius.tsx - Component to receive temperature input from user in Celcius
import * as React from 'react';
import styles from './RecoilDemo.module.scss';
import { escape } from '@microsoft/sp-lodash-subset';

import { useRecoilState } from 'recoil';

import { temp } from './GlobalState';

export default function Celcius() : JSX.Element {

    const [celcius, setCelcius] = useRecoilState<number>(temp);

    return (
        <div>
            Enter Temp (C) : <input type="text" 
            onChange={ (ev : React.ChangeEvent<HTMLInputElement>)=> {
                const temp : string = ev.currentTarget.value;

                // Set the temp value into Global State atom (temp)
                setCelcius(parseFloat(temp));
            }} />
        </div>
    );
}

Farenheit.tsx

This is a straightforward component that makes use of the farenTemp selector and displays the converted temperature in Farenheit.

Whenever the user enters a new value in the Text field in the Celcius component, the Farenheit component is refreshed automatically as it has a dependency on the farenTemp selector which in turn derives its output from the temp atom.

// Farenheit.tax
import * as React from 'react';
import styles from './RecoilDemo.module.scss';
import { escape } from '@microsoft/sp-lodash-subset';

import { useRecoilValue } from 'recoil';

import { farenTemp } from './GlobalState';

export default function Farenheit() : JSX.Element {

    const faren = useRecoilValue<number>(farenTemp);

    return (
        <div>
            <h1>Temp in F : { faren }</h1>
        </div>
    );
}

RecoilDemo.tsx

In order for everything to fit together, we need a top-level component which will have the Celcius and Farenheit components as children. This component will wrap all the components inside a RecoilRoot tag for eveything to work.

This top-level component is loaded by the WebPart and rendered (WebPart code is omitted in this article for brevity. You can find the complete code in the GitHub repo for this article.

// RecoilDemo.ts - Top-level component loaded by RecoilDemoWebPart
import * as React from 'react';
import styles from './RecoilDemo.module.scss';
import { IRecoilDemoProps } from './IRecoilDemoProps';
import { escape } from '@microsoft/sp-lodash-subset';

import { RecoilRoot } from 'recoil';
import Celcius from './Celcius';
import Farenheit from './Farenheit';

export default class RecoilDemo extends React.Component<IRecoilDemoProps, {}> {
  public render(): React.ReactElement<IRecoilDemoProps> {
    const {
      description,
      isDarkTheme,
      environmentMessage,
      hasTeamsContext,
      userDisplayName
    } = this.props;


    return (
      <RecoilRoot>
        <section className={`${styles.recoilDemo} ${hasTeamsContext ? styles.teams : ''}`}>
          <div className={styles.welcome}>
            
            <h2>SPFx React with Recoil JS</h2>
            <div><strong>{escape(description)}</strong></div>
          </div>
          <div>
            <p>
              Following are two different React components that use common atoms / selectors
            </p>
            <Celcius />
            <Farenheit />
          </div>
        </section>
      </RecoilRoot>
    );
  }
}

How it Works

  • The RecoilDemoWebPart loads RecoilDemo.tsx React component
  • RecoilDemo.tsx loads RecoilRoot and hooks up the Celcius and Farenheit components with the atom and selector defined in GlobalState.tsx
  • When the user types a temperature value into the Text field in Celcius component, the temp Recoil atom is updated with the new value
  • This update triggers the farenTemp selector to be executed and subsequently all components using both the atom and the selectors are re-rendered

Running the example code

Clone the github repo to a folder. Open the folder in the command prompt and run the following command

    npm install

Once done run the follown command -

    gulp serve

Now open the online workbench in a browser window and add the RecoilDemo webpart. Enter any numeric value into the text box and watch the Farenheit equivalent displayed by another component.


WebPart project code

The SPFx WebPart code sample for this article can be found at -

https://github.com/mindsharein/spfx-recoil

Conclusion

Recoil is very easy to get started with. The hook based syntax for Atoms and Selectors is very intiutive to use, especially for beginners.

With Recoil, Facebook has provided a much needed alternative to Redux and MobX for state management in React projects.

Tuesday, December 17, 2013

Speed-up troubleshooting with Merge-SPLogFile cmdlet

If there is a medium or large Server Farm you are managing then it is a pain when it comes to troubleshooting using Log file entries.

Thankfully there is a simple cmdlet that merges the log files from ALL THE SERVERS in the farm and provides the entries in a user-define output file. What's more, we can even filter based on several key parameters such as CorrelationID, Date, Area, Category etc.

Here's the syntax for the same -

Merge-SPLogFile -Path  [-Area ] [-AssignmentCollection ] [-Category ] [-ContextFilter ] [-Correlation ] [-EndTime ] [-EventID ] [-ExcludeNestedCorrelation ] [-Level ] [-Message ] [-Overwrite ] [-Process ] [-StartTime ] [-ThreadID ]

Technet reference http://technet.microsoft.com/en-us/library/ff607721.aspx


Saturday, November 16, 2013

Fetching Social Posts data using .NET CSOM in SharePoint 2013

I was looking up on how to work with Social Feeds using the .NET CSOM and worked out some code. Here's the code the retrieves all the Social feed post for a given user and displays them. It also provides option to enter a reply, which is then posted to that Thread.


Friday, October 04, 2013

SharePoint 2013 August 2013 Cumulative Update

Recently I rebuilt SP2013 on my box and updated to the latest SP 2013 August '13 Cumulative update. As usual I stopped the following services before running the updates -

1. IIS Admin Service
2. SharePoint Timer Job Service
3. All Search Services

Stopping the services is to make the update run faster, else it takes many many hours to complete. After running the update, restart and run the Configuration Wizard.

Once the update and re-config is completed, you should be able to see the version number of the Servers and DBs updated to 15.0.4535.1000.

Please note that only the Update for SP2013 Server needs to be run. There is no need to run the update for SP2013 Foundation.as it's included within the SP2013 Server update. An of course the March 2013 Public update needs to be in place before running this update. (The Aug 2013 update included the April and June updates so no need to run those either).

Here are the download Links - 

- SharePoint 2013 August '13 Cumulative Update (CU) - http://support.microsoft.com/hotfix/KBHotfix.aspx?kbln=en-us&kbnum=2817517

- SharePoint 2013 March '13 Public Update - http://www.microsoft.com/en-US/download/details.aspx?id=36989


UserProfile Synchronization with Active Directory Direct Import

Since importing User profiles from AD using Forefront Identity Manager Sync Service is problematic and buggy, SharePoint 2013 includes a new type of import which bypasses the Forefront Identity garbage all together and directly imports from AD. The upside of this approach is that the import is blazing fast and the down-side is that it can be done only one-way. However, a one-way import is more than sufficient for most environments.

In this post i am going to show the steps involved in configuring and running the AD Direct import -

1. The first thing is to make sure that you have a User Profile Service Application provisioned and running. If it's not then you will have to create one and make yourself the Administrator of the same.

2. Once the User Profile Service Application is ready, click on the Manage button under Application Management and Manage Service Applications to come to the list of service applications. Scroll down and click on the User Profile Service Application.

3. Doing step 2 should bring us to the "Manage User Profile" page.

4. On this page, under the second heading called "Synchronization", click on the "Configure Synchronization Settings" link.

5. In the page that follows, scroll down to Synchronization Options and select the second radio button labelled "Use SharePoint Active Directory Import". Now scroll all the way down and click the OK button.


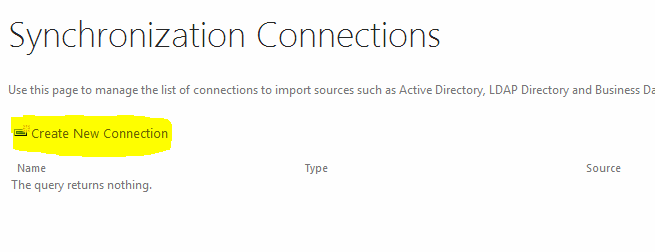
6. Now go back to the User Profile Settings page and click on "Configure Synchronization Connections" under the Synchronization heading.


You will see a page that shows all the connections. If this is the first time, then there will be no connections. Now click the "Create New Connection" link.

7. In the "Add New Synchronization Connection" page enter the Domain details and the Sync Account name and password. The Sync account is a service account having "Replicate Directory Changes". I created a service account called "spupsync" and gave it "Replicate directory changes" permission.


On the page, scrolldown a bit and click on the "Populate Containers" button. If the User account has rights and everything is alright with your AD then you should see the Domain name (NETBIOS name) populated. Now expand and uncheck everything except users.


Finally press "OK" button on this page. You should then be able to see the newly created connection.

8. Now create the "Synchronization Timer Job" by first clicking on "Configure Synchronization Timer Job" on the main User Profile Settings page. Then chose the correct import interval (i chose once every day) and click ok.


9. Finally start the Profile Synchronization by clicking on the "Start Profile Synchronization" link. This will run the Synchronization Timer Job and pull the user details from AD very quickly.

Here are some limitations of direct AD Import -

1. Sync in one-way (Import only)

2. We cannot map AD attributes to "System" SharePoint Profile properties

3. We cannot map two different AD properties to the same Profile property

4. We cannot do cross string type mappings (a value string attribute to a multi value string property or vice versa)


Wednesday, July 17, 2013

Visual Studio 2012 Update 3

The Update 3 of Visual Studio 2012 is now available  here - http://support.microsoft.com/kb/2835600

It has improvements for TFS integration and other bug fixes.

Wednesday, June 26, 2013

Saturday, June 22, 2013

Installing the April 2013 Cumulative Update for SharePoint Server 2013

I have been having issues with the original RTM version of SP2013 that i have installed on my Amazon EC2 VM. So i decided to try and install the Cumulative updates that are available for SharePoint 2013.

The latest CU that is available is the April 2013 CU for SharePoint 2013 Server and Foundation. So I downloaded the same and tried installing. On running the installer, it gives the error - "Required Product not found on this machine". This is because if we want to install the April 2013 CU then first we have to install the March 2013 Public Update (PU) first. So points to note are -

1. Install the March 2013 Public Update for SharePoint 2013 first.

2. Do not download the March 2013 Public Update for SharePoint 2013 FOUNDATION as it's included in the SharePoint 2013 Server Public Update itself.

The March 2013 public update for SharePoint 2013 server can be found here -

http://www.microsoft.com/en-us/download/details.aspx?id=36987

After running the installer and mandatory reboot, run the SharePoint 2013 Configuration wizard & check that everything is working fine in SharePoint.

Now download, extract and run the April 2013 CU for SharePoint Server 2013 (DO NOT DOWNLOAD THE APRIL 2013 CU FOR SP2013 FOUNDATION). The April 2013 CU for SharePoint Server 2013 can be found here -

http://support.microsoft.com/hotfix/KBHotfix.aspx?kbln=en-us&kbnum=2726992

After the installation & reboot, run the Products and Technologies Configuration Wizard to complete the Update.

I found some good links for reference and included the same here -

http://technet.microsoft.com/en-us/sharepoint/jj891062.aspx

http://technet.microsoft.com/en-US/office/ee748587.aspx

http://technet.microsoft.com/en-us/library/ff806331(v=office.15)

http://technet.microsoft.com/en-us/library/ff806338(v=office.15)

http://blogs.technet.com/b/stefan_gossner/archive/2013/04/27/april-2013-cu-for-sharepoint-2013-has-been-released.aspx

http://blogs.technet.com/b/stefan_gossner/archive/2013/03/21/march-public-update-for-sharepoint-2013-available-and-mandatory.aspx

http://blogs.msdn.com/b/russmax/archive/2013/04/01/why-sharepoint-2013-cumulative-update-takes-5-hours-to-install.aspx


Monday, May 20, 2013

What's New in Office 365 - Article on SharePoint Team Blog

A nice article on the new features of SharePoint Online by the SharePoint Team can be found here -

http://blogs.office.com/b/sharepoint/archive/2013/04/02/what-s-new-in-sharepoint-online-top-10.aspx

Hope it helps in understanding the capabilities of the updated SharePoint online.

SharePoint 2013 - March 2013 and April 2013 CU

The latest CUs (Cumulative updates) for SharePoint 2013 have been released. The links are provided in this Technet Article -

http://technet.microsoft.com/en-us/sharepoint/jj891062.aspx

You can find the April 2013 CU's here -

SPF 2013 April 2013 CU - http://support.microsoft.com/kb/2751999
SP 2013 April 2013 CU - http://support.microsoft.com/kb/2726992

I am hoping that these CUs address some of the issues I am having with making the User Profile Sync service up and running :-)

IT Professional Reviewer's Guide for SharePoint 2013

If you are looking at getting a very quick & to-the-point document on the new capabilities of SharePoint 2013 then download the "IT Professional Reviewer's Guide" from the following link -

http://www.microsoft.com/en-us/download/details.aspx?id=34023

Thursday, May 02, 2013

Setting up Service Applications to run SharePoint 2013 Apps

If you have just installed SharePoint 2013 (and not run the Farm Configuration wizard that instantiates all Service Applications to save memory) and would like to try out some Apps, you will get an error during deployment from Visual Studio 2012.

To enable running of SharePoint 2013 Apps we need to setup the following Service Applications -

1. SharePoint, App Management Service
2. Microsoft SharePoint Foundation Subscription Settings Service

The App Management Service can be created from the Central Admin and does not need any special steps. Just create it like any other Service Application.

The Microsoft SharePoint Foundation Subscription Settings Service cannot be instantiated using the UI and can only be created using the following using PowerShell script -


Monday, April 29, 2013

Creating an App Domain for SharePoint Hosted Apps in SharePoint 2013

I just finished setting up a local development environment on my laptop (Guess the configuration? Corei3, 6GB RAM) and find that in spite of the low end configuration of the laptop, SharePoint 2013 runs decently (I have not configured any of the services such as Access Services, Excel Services etc. since my focus is only on doing some App Development).

One of the things that we have to do to make SharePoint 2013 run SharePoint-hosted Apps is to configure a   separate Domain in the DNS. Some people call it the AppDomain and it's misleading because we also have the concept of AppDomains in .NET. 

The first step is to create an instance each of the "App Management Service Application" and "SharePoint 2013 Foundation Subscription Settings Service Application". The App Management service can be created from Central Admin whereas the Subscription service can only be created using PowerShell. I will discuss both in my next post. But make sure that you have both the Service Applications instantiated and associated with your HostWeb (Site to which the Apps will be added).

For now let's look at the steps required to create an App Domain using the DNS Manager in Windows Server. I am running Windows Server 2008 R2 and screens might slightly differ in Windows Server 2012.

Step 1 : Open the DNS Manager

You can find it at Start > Administrative tools > DNS

Step 2 : Create a new Forward lookup Zone

Right click on the Node called "Forward Lookup Zones" and click on "New Zone..."


Step 3 : Select Zone Type

In Zone Type screen, choose "Primary Zone"


Step 4 : Under "Active Directory Zone Replication Scope" choose either the first or second option depending on your domain (For enterprise domains choose the first option, for standalone domain on a dev box choose the second option).


Step 5 : Enter the App Domain Name

This is the interesting part, If your parent domain is called MYDOMAIN.INT, then choose a name such as
APPS.MYDOMAIN.INT.

In my case my domain is called TRAINING.INT so i entered APPS.TRAINING.INT.

Remember, when you deploy your Apps, each App will run under an address such as -

http://app-fdfd323.apps.training.int/

There is also an option to prefix a string to the encoded domain value (more of that later).


Step 6 : Specify Dynamic Updates

Choose the last option "Do not allow dynamic updates"


Step 7 : Verify and Press Finish

Verify the details and press the "Finish" button to complete the Wizard. 


Step 1 - 7 will create a new Domain under which SharePoint Host Apps will run.

Step 8 : Create a wildcard CNAME entry for the App Domain and Point the CNAME to your SharePoint Server

The last step in the DNS Manager is to create a CNAME (Canonical Record) DNS Entry by first expanding the Forward Lookup Zones node, right clicking on the App Domain node and then choosing "New CNAME..". 

In the New Resource Record Dialog, enter * in the Alias name field and in the FQDN field, specify the Host Name of the SharePoint Server.

In my case, the SharePoint server is called "SHAREPOINT" and domain name is "TRAINING.INT" so I entered "SHAREPOINT.TRAINING.INT"

Now press OK to complete the creation of CNAME entry.


Well that's all you have to do in the DNS Manager, but we are not done yet. The final step is to configure APP URLs in the Central Admin. So open up the Central Administration Website and follow these steps - 

Step 1 : Open up Central Admin and Click on Apps

Now enter the App Domain name that we just created in DNS and optionally specify a prefix (If we specify a prefix such as "app" then the Apps will run under a URL such as http://app-fdfd43ed.apps.training.int/...)


If everything has been done correctly (and you have also created and associated the required Service Applications) the you're ready to start running SharePoint-hosted Apps now!


Thursday, October 04, 2012

Technet Resource Centers

Microsoft has done an excellent job of putting together reference and training material for SharePoint 2010 on Technet.

I was looking for something on BI with SP2010 and found this link -

http://technet.microsoft.com/en-us/sharepoint/ee692578.aspx

Going up one level brings us to the "SharePoint 2010 Resource Centers" on Technet -

http://technet.microsoft.com/en-us/sharepoint/ff465365

I wish these links could be some good and easy to remember subdomains or sub-sites on TechNet to make it easier to find.

Anyways i hope the resource centers links are good starting points for deep dives into specific topics.

Wednesday, August 08, 2012

Download MSDN Magazine for free

Folks, if you remember reading the print issues of MSDN Magazine and want to read them again, you can download all the older and latest editions in electronic format from here - http://msdn.microsoft.com/en-us/magazine/ee310108.aspx ( PDF format for latest ones and .CHM format for archived ones)

Happy reading!

SharePoint 2013 UI Improvements - Team Site Improvements

Writing this blog article, I have opened up SharePoint 2013 preview in another browser window to play around with and understand some of the new UI features. In this series, we'll be looking at the Team Site and in the next, the Publishing site (Site with Enterprise Features turned-on).

Firstly, the whole UI is modelled on the minimalist Office 2012 UI - flat, neat 'n' clean and with elements of the Windows 8 metro thrown in for good effect. The UI and Functionality are aimed at the typical office worker and have a very informal air about them.

The Team Site - The Office 365 preview of 2013 comes with a default teamsite that looks like this - 

Home page of TeamSite with different elements marked. Those marked with * are new (including the entire Action Menu)

Let's look at some of the improvements and changes in 2013 when compared to SharePoint 2010.

Hidden Ribbon - One of the changes that increases the screen real estate is the hidden ribbon. In 2010 the ribbon is visible by default and we had to hide it manually. Now the ribbon is hidden by default. To get the ribbon, we have to click the Menu item in the TopLink bar and to hide it just click on the Browse link.


Ribbon 'on-demand'


This is a cool feature, as it reduces the page clutter. Notice how the ribbon hides the Site Icon, Title and Search Box when it is visible without pushing them down.


"GettingStarted" WebPart - This is a webpart that diplays Metro style icons that display links to common tasks. On hovering over any icon the translucent overlay slides up to cover the entire icon. Looks like this webpart is not customizable directly.


The "GettingStarted" WebPart on the Teamsite Home Page


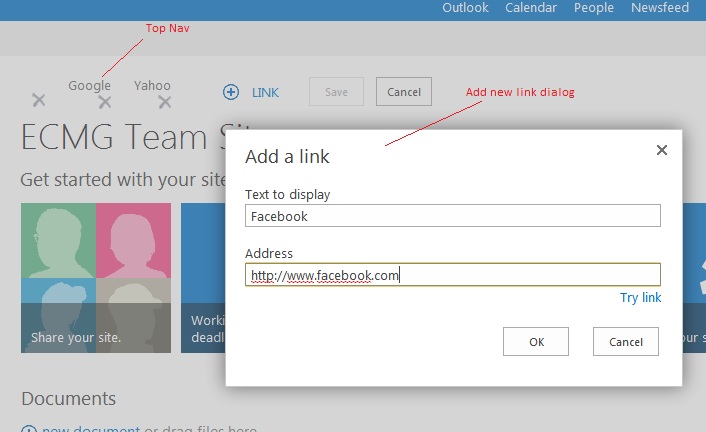
Editable Left Nav bar - The Left Nav bar (list of links on the left) are editable in-place now. Click the "Edit Links" button below the left nav and press the "+" button, which then pops up a dialog in which we can enter the title and url for the new link. All the editing's In-place and using a user-friendly modal dialog as show in the images below.


Editable Top Nav Bar - Similarly, the Top Nav bar too is editable in-place with similar UI as shown below-


All efforts have been made to enable the end-user to customize the navigation, in-place, without having to go to the settings page links. It makes the UI much more intuitive and user-friendly.

Document Library View UI Improvements - Now adding or uploading a new document to a document library does not require going to the ribbon buttons, instead, a context sensitive menu pops up on the page itself that has links for creation / upload.


Welcome Control and Site Action Menu changes - In this edition, 'all the action' has moved to the top left so that the user has all the clickable controls within close reach.


Those familiar with 2010 may already know the functionality behind these buttons, so we are just going to look at what's new! Well the coolest thing is the "Focus on Content" button - press this and the Left Nav, Site Icon, Site Title, Top Nav and Search box are hidden or shown (toggle button). When these are hidden, the PlaceHolderMain (Main area) expands to fill all the space below the ribbon. This allows the user to focus more on the content rather than getting distracted by the leftnav, icon and title and it gives more screen space to display content! With this rate, I think, the next version of SharePoint will have minimal.master as default masterpage :-).


All these new features are on just the home page. In the coming days as we'll explore more to find out the
improvements on the inside.


Using Recoil with SPFx Try out the latest alternative to Redux with SPFx When developing with Redux or MobX, we have ha...