I just finished setting up a local development environment on my laptop (Guess the configuration? Corei3, 6GB RAM) and find that in spite of the low end configuration of the laptop, SharePoint 2013 runs decently (I have not configured any of the services such as Access Services, Excel Services etc. since my focus is only on doing some App Development).
One of the things that we have to do to make SharePoint 2013 run SharePoint-hosted Apps is to configure a separate Domain in the DNS. Some people call it the AppDomain and it's misleading because we also have the concept of AppDomains in .NET.
The first step is to create an instance each of the "App Management Service Application" and "SharePoint 2013 Foundation Subscription Settings Service Application". The App Management service can be created from Central Admin whereas the Subscription service can only be created using PowerShell. I will discuss both in my next post. But make sure that you have both the Service Applications instantiated and associated with your HostWeb (Site to which the Apps will be added).
For now let's look at the steps required to create an App Domain using the DNS Manager in Windows Server. I am running Windows Server 2008 R2 and screens might slightly differ in Windows Server 2012.
Step 1 : Open the DNS Manager
You can find it at Start > Administrative tools > DNS
Step 2 : Create a new Forward lookup Zone
Right click on the Node called "Forward Lookup Zones" and click on "New Zone..."
Step 3 : Select Zone Type
In Zone Type screen, choose "Primary Zone"
Step 4 : Under "Active Directory Zone Replication Scope" choose either the first or second option depending on your domain (For enterprise domains choose the first option, for standalone domain on a dev box choose the second option).
Step 5 : Enter the App Domain Name
This is the interesting part, If your parent domain is called MYDOMAIN.INT, then choose a name such as
APPS.MYDOMAIN.INT.
APPS.MYDOMAIN.INT.
In my case my domain is called TRAINING.INT so i entered APPS.TRAINING.INT.
Remember, when you deploy your Apps, each App will run under an address such as -
http://app-fdfd323.apps.training.int/
http://app-fdfd323.apps.training.int/
There is also an option to prefix a string to the encoded domain value (more of that later).
Step 6 : Specify Dynamic Updates
Choose the last option "Do not allow dynamic updates"
Step 7 : Verify and Press Finish
Verify the details and press the "Finish" button to complete the Wizard.
Step 1 - 7 will create a new Domain under which SharePoint Host Apps will run.
Step 8 : Create a wildcard CNAME entry for the App Domain and Point the CNAME to your SharePoint Server
The last step in the DNS Manager is to create a CNAME (Canonical Record) DNS Entry by first expanding the Forward Lookup Zones node, right clicking on the App Domain node and then choosing "New CNAME..".
In the New Resource Record Dialog, enter * in the Alias name field and in the FQDN field, specify the Host Name of the SharePoint Server.
In my case, the SharePoint server is called "SHAREPOINT" and domain name is "TRAINING.INT" so I entered "SHAREPOINT.TRAINING.INT"
Now press OK to complete the creation of CNAME entry.
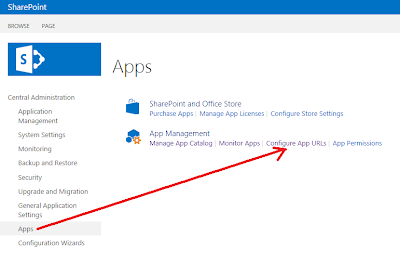
Well that's all you have to do in the DNS Manager, but we are not done yet. The final step is to configure APP URLs in the Central Admin. So open up the Central Administration Website and follow these steps -
Step 1 : Open up Central Admin and Click on Apps
Now enter the App Domain name that we just created in DNS and optionally specify a prefix (If we specify a prefix such as "app" then the Apps will run under a URL such as http://app-fdfd43ed.apps.training.int/...)
If everything has been done correctly (and you have also created and associated the required Service Applications) the you're ready to start running SharePoint-hosted Apps now!


